New Plot – New Beginnings
Best 4 Steps to Plan Your New Allotment
Don’t be overwhelmed by your new allotment. Follow our guide and we’ll have you enjoying your days on your new plot.
You’ve got your new allotment! Congratulations! Welcome to the world of allotment gardening. We hope it brings you hours of pleasure for many years and becomes a productive plot.
Yet, at the moment, does it look like the only thing ever planted there was weeds?
Don’t worry, we’ve all been there before. You must remember why you took on this endeavour. So, take a deep calming breath and read our guide to help you plan your new allotment.
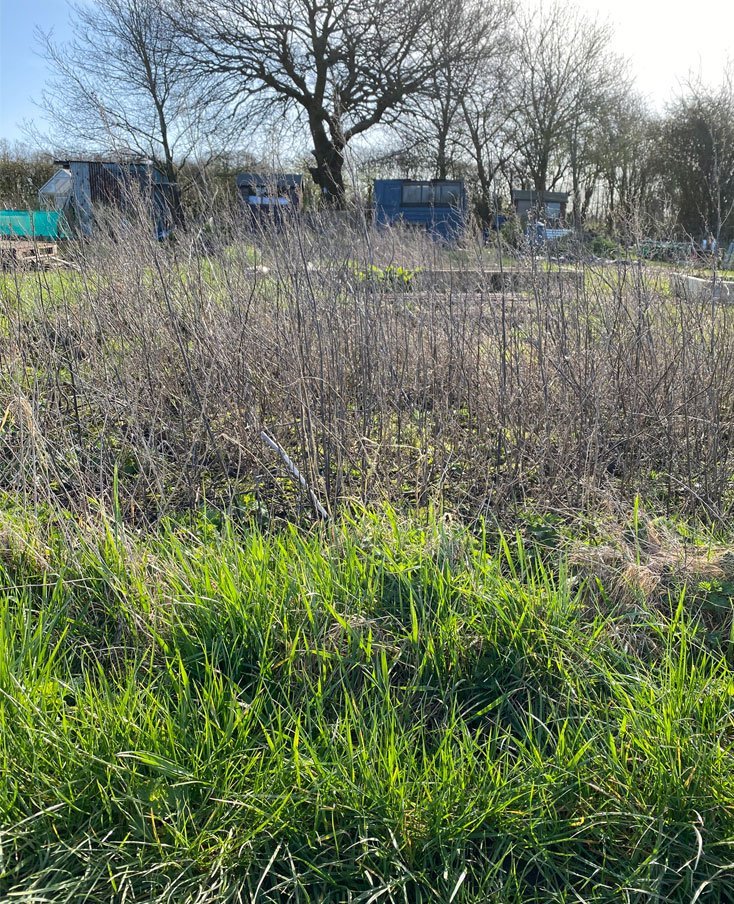
Does this resemble your new allotment site? A mass of weeds and wooden debris left over from a previous owner.
Don’t despair! Many new allotment gardeners have been faced with a site like this. It may seem daunting but there are silver linings to this.
- The abundance of weeds doesn’t mean it’s a wasteland. In fact, it means the ground is fertile.
- Weeds can be used as ‘green manure’
- Something that looks like a weed could be a perennial fruit or vegetable plant. Meaning you already have your first crops.
- The wooden debris could be raised beds or cold frames that can be easily resurrected with a bit of TLC.
Taking stock of what you have is the first step to help you plan your new allotment.
STEP 1 – GET TO KNOW YOUR AREA
Take this time to also learn more about the location of your allotment. Most allotments will have their own micro-climate, distinct from the town or city it is in. You will also need to get to know the type of soil you have. But there is no need to get too scientific about it.
Stand, or better still sit, awhile on your new allotment plot. Make a note of where the sun rises and falls. Check for anything that’s causing shade, can it you remove it? How open is your plot to the wind, will it cause damage? Are those existing plants that worth keeping?
Without a doubt, the best way to know the area is to get to know your neighbours. Go ahead and introduce yourself to your fellow allotmenteers. Most allotment gardeners are a friendly bunch and will be only too willing to pass on their knowledge.
I’m sure they will have many personal pearls of wisdom and growing experiences to tell you. From them you can find out what type of soil you have. What part of the allotments get the most sun or shade and which parts get waterlogged. All vital pieces of information you need to plan your new allotment.

There are six main soil types in the UK
- Clay
- Sand
- Loam
- Silt
- Peat
- Chalk
STEP 2 – PLAN YOUR CROPS
The choice of what crops and plants you grow is your own personal choice. With a vegetable garden, this will depend on what food you like to eat, of course. Start making a list. If the list is a long one you have to realise that it will be hard to grow everything. Especially in your first season. So some things may have to come off of it to start with.
A good way to strike things off of the list is to look at what produce is easy to buy in the supermarkets. A good example is garden peas. You can find these in most stores. They’re cheap and available frozen or tinned all year round. Are they worth your time and effort or the space on the plot?
Now, we don’t want to put you off growing common crops though. These can be quick wins giving you successes in your first season. And any early success will inspire you to continue growing. Radishes, tomatoes, salad leaves and potatoes are great common first produce. But think about growing different varieties than those in the shops. Ones that aren’t so popular but no less tasty. Perhaps choose from a ‘back from the brink’ range from a heritage seed supplier.
Another way you can refine your list is by thinking of fruit and veg you like but can’t always find. We started our second allotment when the supply of courgettes was under threat. We also grow pak choi because it isn’t so abundant in the local supermarkets. And we love them in a Pad Thai.
As well as fruit and vegetables, think of companion planting. This can prove to be an effective way of controlling pests. Plant flowers such as nasturtiums to deter aphids and alliums to ward off carrot root fly.
Once you have your choice of crops sorted, it’s time to go out and buy the seeds. Yay!!
STEP 3 – DRAW UP YOUR PLANS
You’ve walked around the allotment and studied how the climate affects it. You’ve made friends with the gardeners on neighbouring plots. You’ve taken the time to decide what crops to grow. Brilliant! Now it’s time to plan your new allotment’s growing space.
Taking the time to visualise and draw how your plot will look can be fun. It will also serve as a reminder of how everything will look when you’re finished. This is great for keeping you motivated when everything seems a bit tough.
Common Ways of Drawing a Plan
- Notepaper and Pen
- Graph Paper and Pen
- Excel Spreadsheet
For the drawing to be accurate, you need to know the size of your allotment garden. Here’s a nerd fact. Did you know the standard allotment size was considered to be 10 poles or 302.5 square yards? Your plot of land may be smaller though, so best to get the measuring tape out.
Don’t make it too complicated. At Silver Acres we don’t worry too much about total square yards or square metres. We only want to know length and width of the total plot. Then we divide the plot into beds, or growing areas.
We don’t worry too much about how many square yards or square metres there are altogether. We only want to know length and width of the total plot. So we can start to divide the plot into beds, or growing areas.
Lined notepaper is a workable way to draw up your plan. Divide the length of your plot by the lines on a page. Now you have the start of a grid. Create rectangles or squares using the lines and these are the beds. Now you can write inside each shape what you what to grow there. It’s a rudimentary system but effective.
Graph paper takes the notepaper up a notch. Now you have more accuracy. The rows and spacing between plants within the beds can be super precise. Yet, the method follows the same as standard notepaper.
For the more computer literate an excel spreadsheet can create a colourful plan. The cells within the spreadsheet become your beds. To make it super picturesque grab images of the crops you want to grow and add them to the cells.
STEP 4 PLAN THE WORK
All set to get to work on the ground now. But before you rush in with a spade, pause a moment. Consider a few things, including the following;
- What season are you in?
- How much time can you spend on the plot each week?
- Is digging necessary at all?
Receiving your new allotment in winter may not seem ideal. After all, you may not be harvesting anything until 8 months. But to us, it is a perfect time. You now have time to fully prepare the soil. Adding nutrients where needed. And clearing your space ready to plant your fruit and vegetables.
If you first set your feet on your allotment in Spring its a bit of a catch up. You’ll have to work quick to get everything ready for sowing and planting.
No matter which season you are in we recommend covering as much of the ground as possible in tarpaulin. This is great at suppressing weeds. You then only have to peel back the parts that you have the time to work on.
Raised beds are very popular when first starting. And there are many good reasons to recommend them. Their main benefit is you can buy your soil from a garden centre. This should already have a perfect composition and blend of nutrients. Ready to start sowing your seeds. The soil will also warm up faster in spring.
Do you have to dig?
We started our allotment following the no-dig method pioneered by Charles Dowding. It involved making beds by laying cardboard down and covering it with a mulch. We can say that this method does work and you should look into it further to avoid laborious work. Especially weeding.
Plan your new allotment’s workload

Time
How much time can you spare. Don’t attempt too much too soon.

Season
What season is it? Each season has its own tasks that need to be done.

Clear Rubbish
Working in the mess someone else left behind can bring you down.

Planting
Sowing everything at once is unlikely. Plan to plant one bed at a time.
Quick Questions & Answers
Commonly asked questions when starting to plan your new allotment.
How do I know what soil I have?
Answer
What is companion planting?
Answer
Think of another question?
Then think of an answer

Let’s Connect
Drop us a line and let us know how your plan is going